
This Persian Rice recipe, also known as Tahdig, is a must-try side dish that’s bursting with texture and flavor. Cooked to crispy perfection, it has a rich, golden crust with a moist, tender center that’s unbelievably delicious!
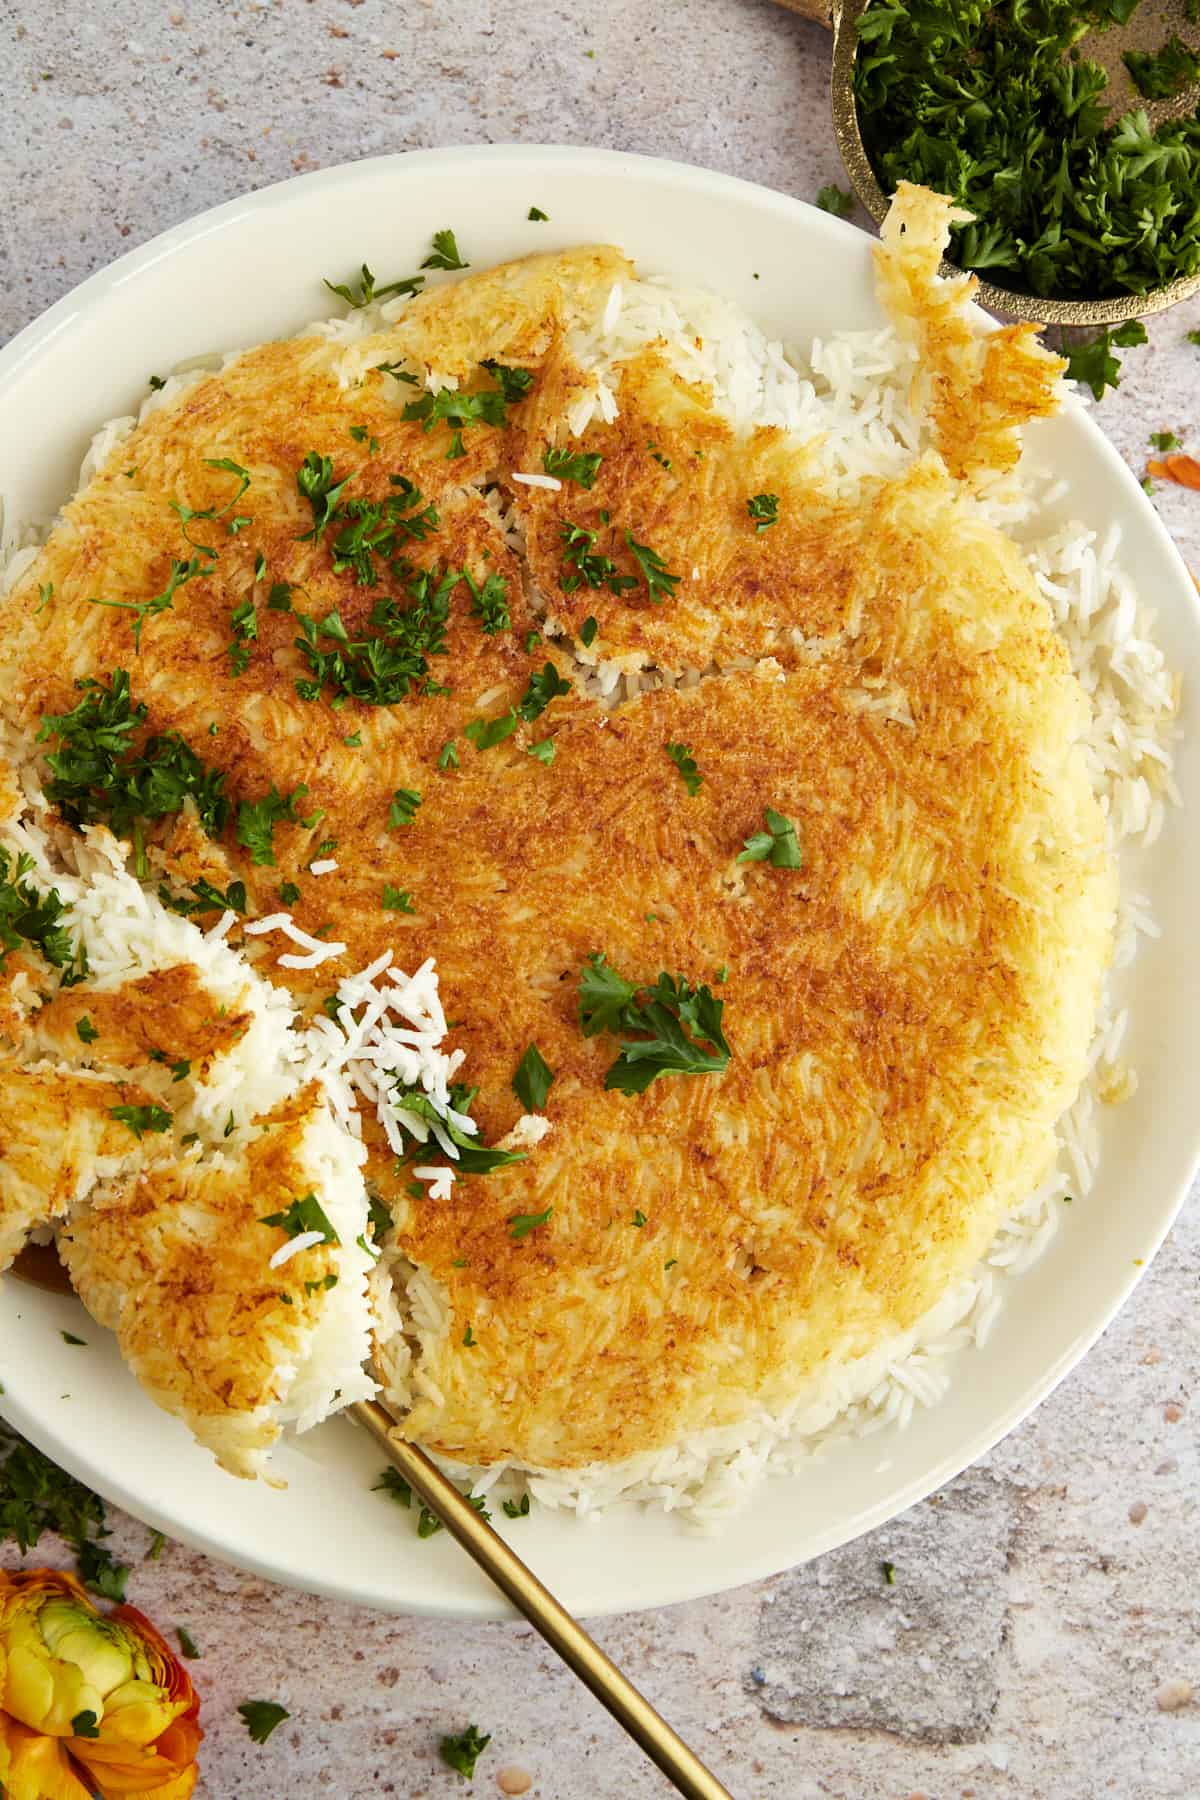
Table of Contents
Why You’ll Love This Persian Rice Recipe
This Persian rice recipe is guaranteed to become your new favorite side dish with just one bite! Here are a few reasons why:
- Just 4 budget-friendly ingredients are all you’ll need.
- It’s easy to make and perfect for feeding a crowd.
- It stores well for leftovers you’ll look forward to eating.
- It’s rich in flavor with a moist and fluffy texture you’ll adore.
What Is Persian Rice?
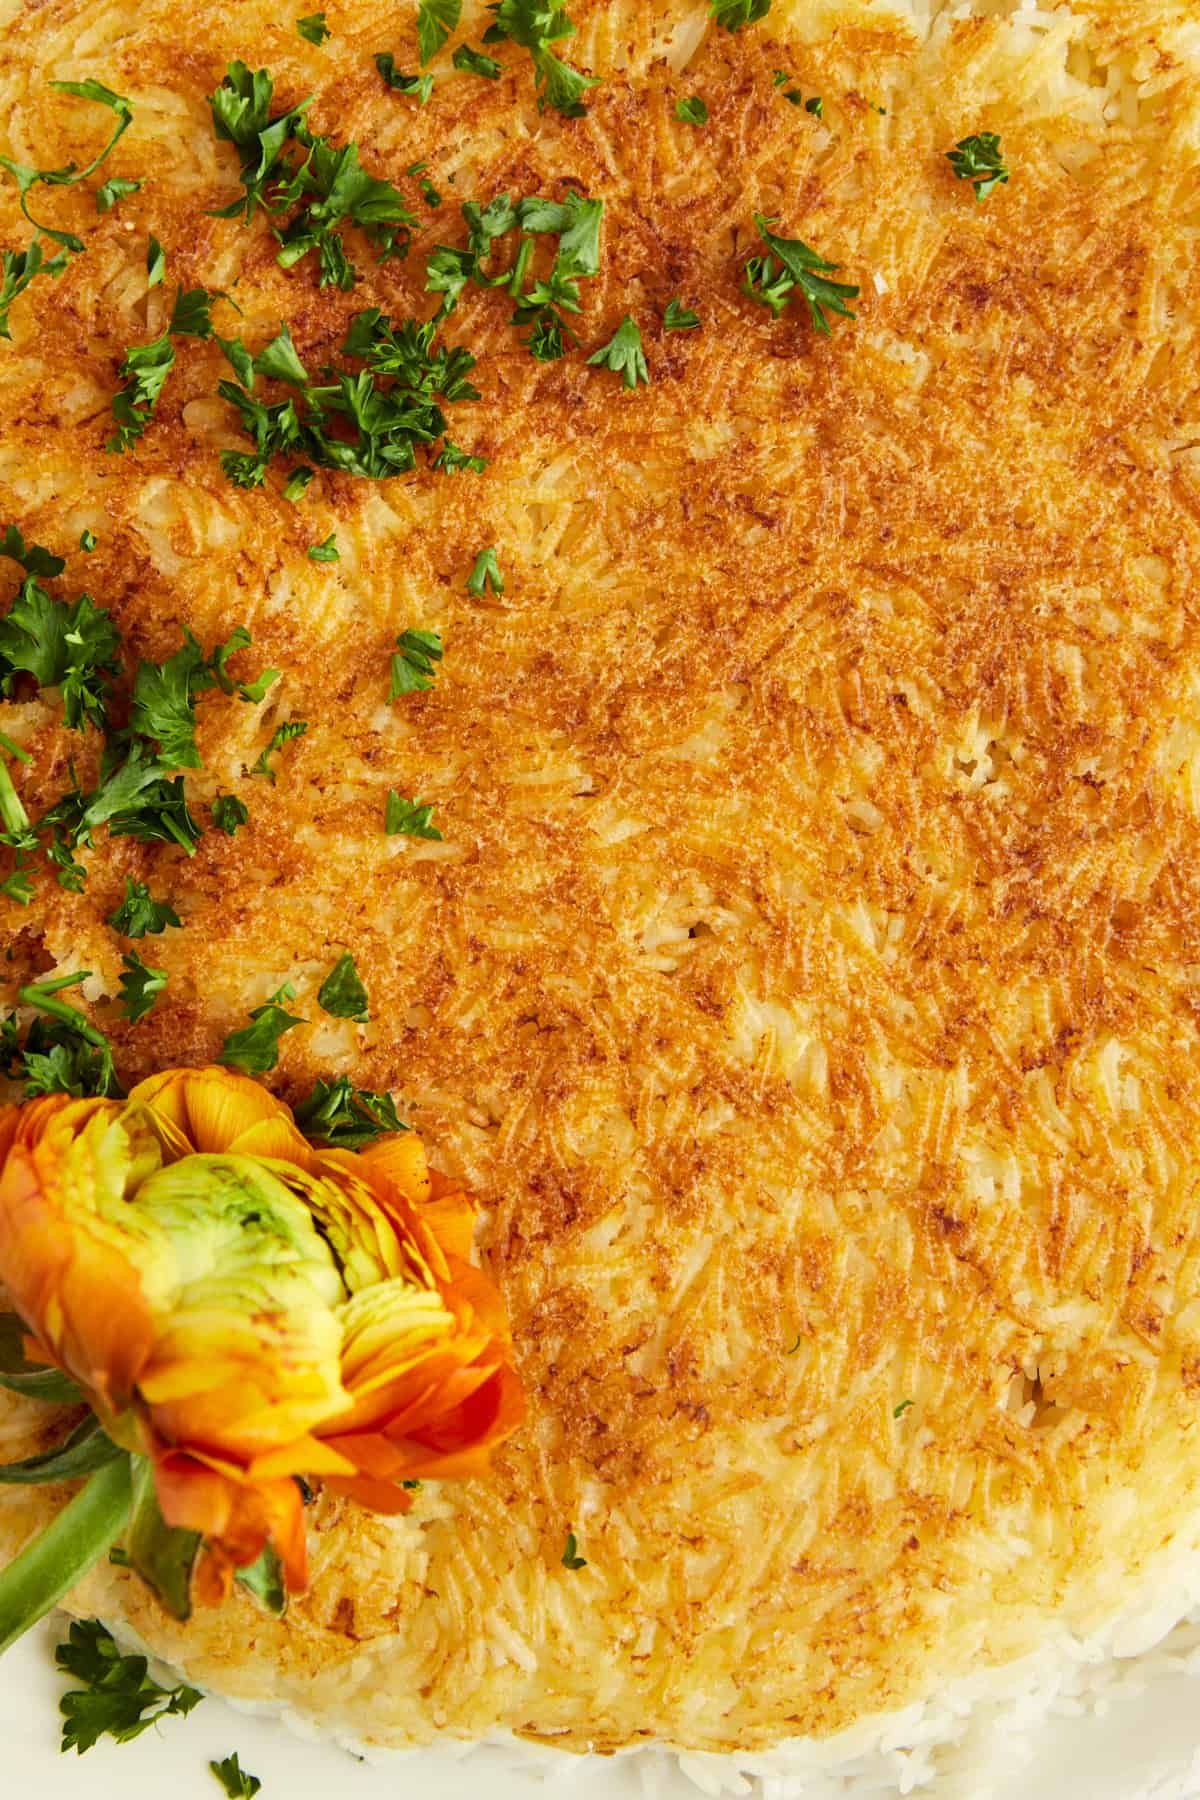
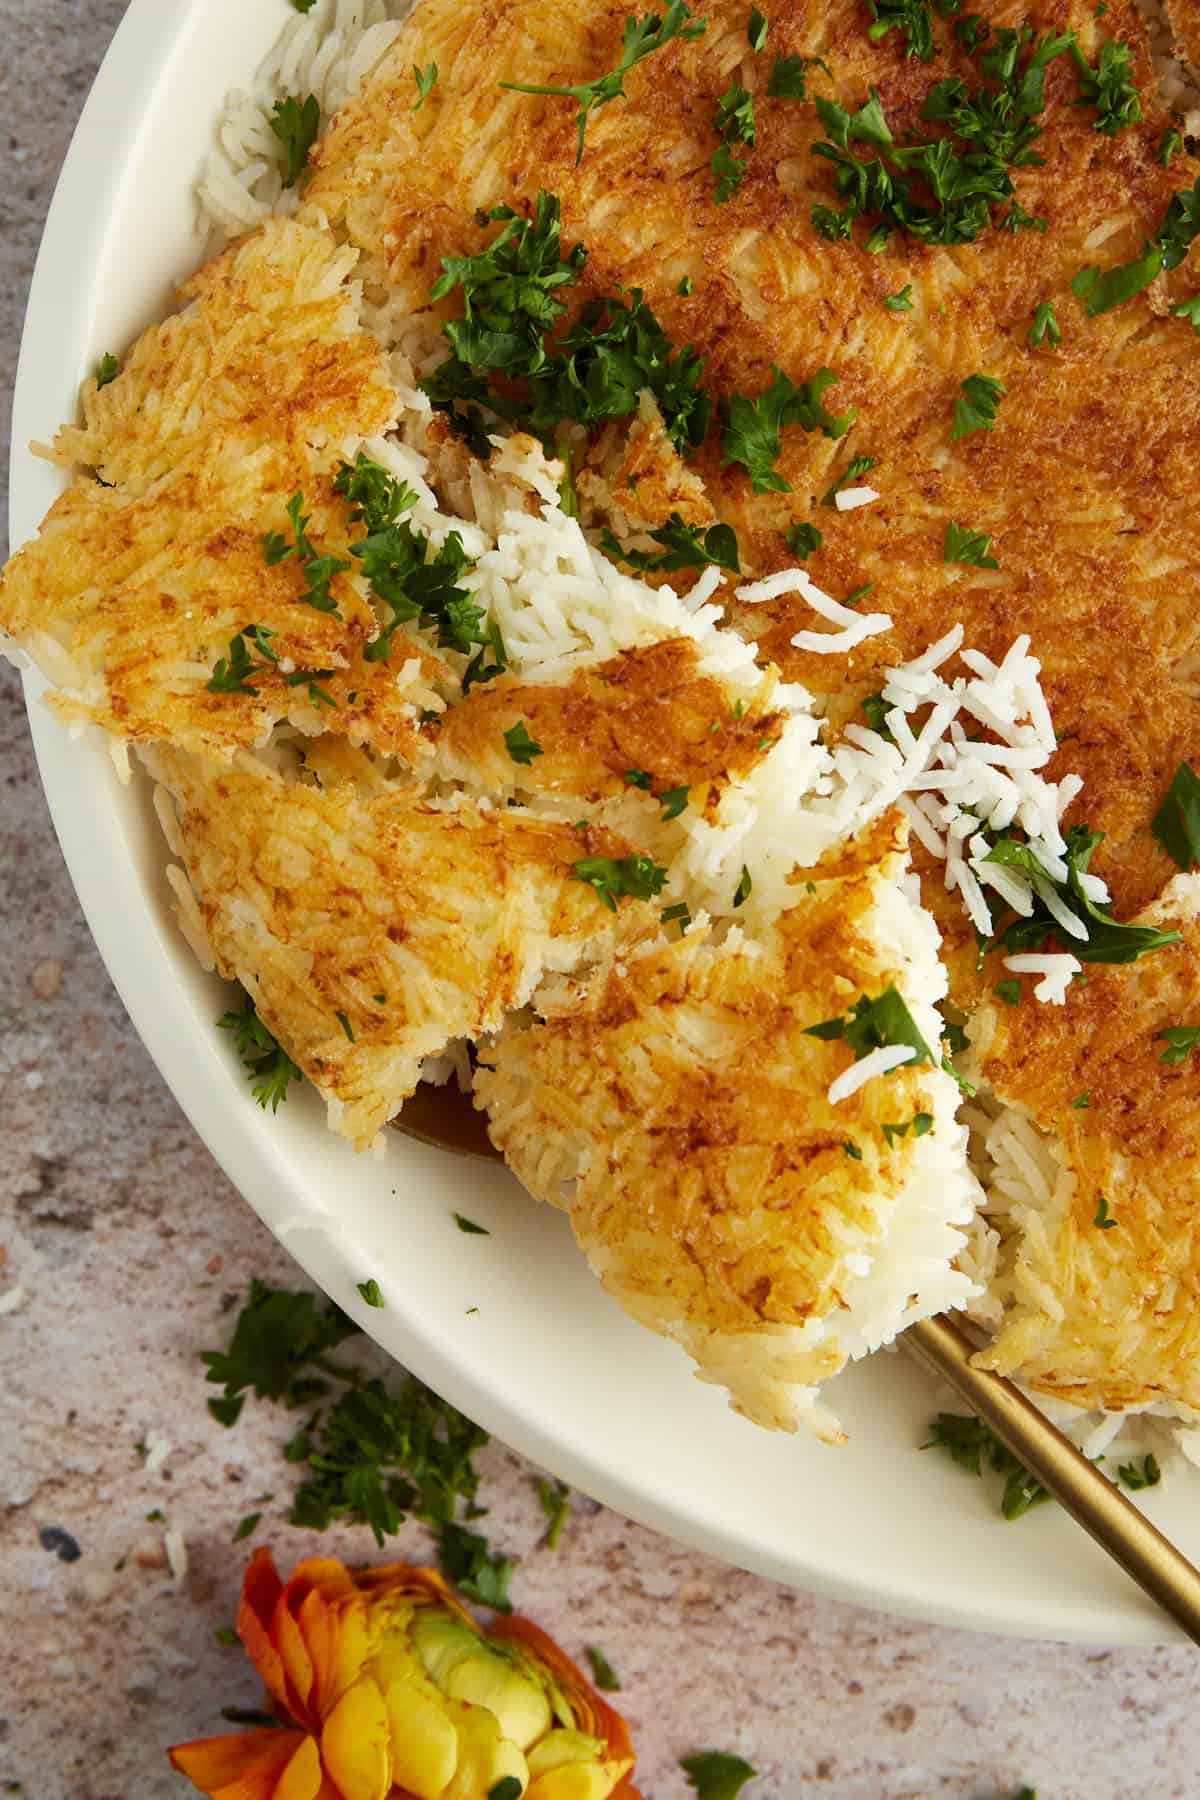
When referred to by its Persian name, tahdig, Persian rice translates to mean “bottom of the pot”. It is a popular side dish that cooks rice in a way that results in a beautiful golden and crispy exterior with a soft, fluffy interior. Tangy and delicious, it’s so good you’ll want to eat with nothing but a spoon. However, it also pairs well with all your favorite main courses!
Simple Ingredients
With such a beautiful appearance and rich taste, you’re not going to believe that this Persian rice recipe comes together with just 4 ingredients! Here’s what you need:
- Rice – Uncooked Basmati rice works best to create the fluffy texture we’re looking to achieve.
- Salt – Used to enhance the rest of the ingredients.
- Sour Cream – This helps lock in moisture and adds a creamy texture that makes this rice out of this world.
- Ghee – Creates a rich, buttery flavor.
How to Make the Best Persian Rice Recipe
This Persian rice recipe requires a few extra steps than your standard white rice. However, it’s still simple to make, and the flavor is completely worth the effort!
- Prepare the Rice. Fill a large stockpot with 4 quarts of water, and bring it to a boil over high heat. In the meantime, rinse the rice in a colander with cold water, mixing vigorously until it runs clear, and drain. Add 3 tablespoons of salt to the pot, add the rice, and stir to combine. Cook the rice to al dente, stirring occasionally, and drain it in a sieve. Immediately rinse the rice with cold water to prevent it from cooking further, and drain.
- Combine. In a bowl, combine the sour cream and 1 cup of the parboiled rice.
- Cook. Melt the ghee in a large non-stick frying pan over medium heat. Add the sour cream and rice mixture, spreading it out in an even layer. Pile the remaining rice on top, mounding it gently towards the center.
- Make Holes. Use the handle of a wooden spoon, and gently dig 5 or 6 holes into the rice to the bottom of the pot to allow steam to escape from the bottom.
- Continue Cooking. Cook the rice over medium heat, rotating the pan a quarter every 3-4 minutes. Once the bottom of the rice has turned golden brown in color, reduce the heat to low, and continue to cook for 15-20 minutes.
- Serve. Run a spatula along the edges of the pan to ensure the rice does not stick. Then, carefully flip it over onto a platter or cutting board, and enjoy warm!
Pro-Tips
Follow the extra tips and tricks below to ensure your Persian rice has the perfect texture every time you make it.
- Rinse Well. You want to make sure to use your fingers to stir the rice around, rinsing it completely until the water runs clear. Otherwise, it won’t become golden and crisp!
- Use a Non-Stick Pan. This is crucial to ensuring the crust forms and becomes sticky and the rice can be removed from the pan in one piece.
- Don’t Stir. Unlike other rice recipes, you do not want to stir the mixture around as it cooks. Once added to the pan, keep it in place!
- Have Patience. Whatever you do, don’t increase the heat in an attempt to get the rice to cook faster. The key to creating a crisp exterior while keeping the center moist is to cook it long and slow over medium-low heat.
Substitutions and Additions
We love the simplicity of this Persian rice recipe! However, feel free to mix and match different ingredients and add-ins to use what you have on hand and make this recipe your own.
- Use Different Rice. Don’t have Basmati rice on hand? Feel free to swap it out with any other long-grain white rice like Jasmine rice instead.
- Add Saffron. Many Persian rice recipes include saffron for a unique earthy, sweet flavor.
- Include Meat. Transform this side dish into a complete meal by adding meat like beef kofta, ground turkey, or lamb on top!
Use Greek Yogurt. If you don’t have sour cream, use Greek yogurt for a similar tangy taste and moist texture while adding a boost of protein.
How to Store
This Persian rice recipe is best served while it’s warm and fresh. However, if you do have leftovers, they can be transferred to an airtight container and stored in the fridge for up to 4 days. To keep it fresh, we recommend storing it with the crispy side facing up.
Then, when you’re ready to eat, you can easily flip it back over into a pan. Warm it over medium heat, adding extra oil or ghee to help the crust crisp back up, and enjoy!
Can I Freeze This Persian Rice Recipe?
We don’t recommend it, because it’s likely to become a bit soggy once thawed. However, if you do give it a try, we recommend letting it thaw in the fridge overnight and warming it in a skillet, crust side down.
Serving Suggestions
You can serve this Persian rice recipe with all your favorite main courses! Some of our favorites are:
Persian Rice Common Questions
Tahdig is typically served by inverting the pot onto a serving platter, showcasing the golden crust on top. It’s a show-stopping presentation that highlights the crispy layer as the star of the dish.
Long-grain basmati rice is the preferred choice for Tahdig. It cooks up fluffy and separates easily, which is ideal for forming that coveted crispy layer! Just be sure to rinse and soak it before cooking to remove excess starch.
You’ll hear a gentle sizzling sound as the crust forms. After about 30-45 minutes on low heat, you can check by gently lifting the edge with a spatula to see if it’s golden brown. Once it’s reached that perfect hue, it’s ready to serve!
Not at all! While it might seem intimidating, with a bit of patience and the right technique, even novice cooks can achieve that perfect crispy layer. The key is controlling the heat and allowing the crust to form without burning
Would you like to save this? 🔖
Persian Rice Recipe (Tahdig)
Ingredients
- 2 cups basmati rice uncooked
- Kosher salt to taste
- 3 Tablespoons sour cream
- 6 Tablespoons ghee
Instructions
- Fill a large stockpot with 4 quarts of water, and bring it to a boil over high heat.
- In the meantime, rinse the rice in a colander with cold water, mixing vigorously until the water starts to run clear. Drain the rice.
- Once the water comes to a boil, add 3 tablespoons kosher salt to the pot. (It may seem like a lot of salt, but it’s the only way to add flavor to each grain or rice! Add the rinsed rice, and stir to combine.
- Set a fine-mesh sieve or colander in the sink. Cook the rice 6-8 minutes or until al dente, stirring occasionally. Drain into the sieve, and immediately begin rinsing with cold water to stop the rice from cooking further. Drain immediately.
- In a bowl, add the sour cream and 1 cup of the parboiled rice, stirring to combine.
- Melt the ghee in a non-stick frying pan over medium heat. Add the sour cream and rice mixture, spreading it out in an even layer. Pile the remaining rice into the pan, mounding it gently toward the center.
- Using the handle of a wooden spoon, gently dig 5 or 6 holes into the rice down to the bottom of the pot to allow steam to escape.
- Continue to cook the rice over medium heat for 15-20 minutes, turning the pan a quarter turn every 3-4 minutes to ensure even browning until a golden crust begins to form on the bottom of the rice.
- Reduce the heat to low, and continue to cook 15-20 minutes or until the rice is fully cooked and golden brown on the bottom.
- Carefully run a spatula along the edges of the bottom of the rice to ensure it does not stick to the pan. Flip it over onto a platter or cutting board. (It should look like a cake of fluffy rice with a golden crust.) Serve warm!
- Store in an airtight container in the fridge for up to 4 days.
Nutrition
Nutrition information is automatically calculated, so should only be used as an approximation.
More Rice Recipes
Looking for more ways to enjoy rice? Try out some of our favorite recipes below!


Hi Alia & Radwa
I am making the Persian Rice. Just a question: do you cover the rice whilst its cooking
Thanks
Brigitte
Hi Brigitte! We leave it uncovered. We hope you enjoy!
Xo,
Alia & Radwa